The lockdown has certainly been a place for breeding creative ideas. With two birthdays during the weirdness, we have had to stretch those idea muscles. Jit did a Crystal Maze hunt for my presents on my birthday and I created a DIY Escape Room for his. Something which was equally challenging for me as it was enjoyable to see him play.
This post will be about coming up with ideas for it and how you might tackle it the same. I might (at some point) share a printable, but we’ll see!

Creating a DIY Escape Room
Now I will be completely honest here. I thought that creating an escape room would be pretty simple. Bearing in mind that I have only ever done one before, and that was two years ago, I was at the top end of the optimism scale. It was far harder than I imagined, but once I got rolling and planning, I managed to pull things into place. I am not saying that to put you off, which is why I am sharing my tips. And considering sharing my escape room with you.

Coming up with the story
From what I realised, the story is the clincher for a good escape room. There needs to be a theme running through and a goal at the end. Otherwise, you’re kind of just going through a series of puzzles with no connection. My tips for coming up with a story are to think about who will be playing? What are they into? For example; dinosaurs, space travel, history, art galleries, gangster stories or code breaking. In my case, I opted to adapt the Alan Turing/Bletchley Park code breaking idea into my own local story. The reasons behind this is that we planned to revisit this year and we live in Manchester, home of Alan Turing, as well as being just near to Alan Turing Way.
You can of course, pick from absolutely anything you can think of which you can make into a puzzle and treasure hunt style mission.

The Plot
The next stage of planning your DIY escape room is to come up with the plot of your story. How will you introduce it? What is the end goal? And how will the participant get there?
For my story, I introduced Jit to the Codebreakers of Newton Heath plot. The Head of the Department was trying to take the glory for Jit and the team breaking the code to save the world. The mission was to try to rescue the documents which the Head was trying to destroy (proof of the team doing the code breaking) and get to the news desk in Manchester city centre before the paper went to print. Of course, it was all imaginary, but it was exciting to create that sense of urgency to the story to help keep things moving.
Working out the journey and clues
This was the challenging part of the process. Trying to bring the story to life, work out places for the clues and puzzles to be hidden and also how to lock them. Plus, I wanted to make sure that the clues were spattered through the resources. The idea was to make things a bit more challenging.

To start with, I planned out where I would hide the clues so that I could set it up without Jit seeing. With him working from home with me at the moment, it posed an extra challenge with arranging things. I opted to have the clues and activities around the house rather than in one room. This would make the one-man DIY escape room a bit more varied and easier for me to hide things.
Collecting your kit
I didn’t want to spend too much money creating the DIY escape room, so I scoured the house for items I could use to create it. This included old padlocks, packaging boxes, bags and other bits and bobs. I then did some Google image searches to find pictures which would be fitting to my theme, so I could print them out as decoy pieces or to use as part of my clues. I did order a couple of locks (which we needed anyway) to help make the game a bit more varied. I’ll share my exact kit list when I write up the how to post.

Once I had a plan of the story and the plot, where the clues will be and how many locks I had, I could get planning the journey and clues. I employed Google and Pinterest to help me come up with codes to hide my messages.
Creating the Codes
Depending on the age of the participants and how long you want the DIY escape room to take will help you to choose the kinds of puzzles and how many you include. For my game, I included three kinds of word puzzle as well as some text clues. We had plenty of time for Jit to work through it all.

As well as the clues to take Jit around the escape room, I included some which would help him to collect letters of an anagram to solve the word lock at the end. These were hidden in messages, on pictures and in cutouts of decoy clues. This meant that he had to pay attention to all the materials in case there was something useful for later.
The Case File
To begin the DIY escape room, I decided to give him an envelope filled with goodies. Or a case file as I decided would be more fitting. Inside the envelope were some dummy clues as well as bits and pieces for later in the game, including a key with a code on the keyring, the first clue and code as well as the welcome message setting the scene.
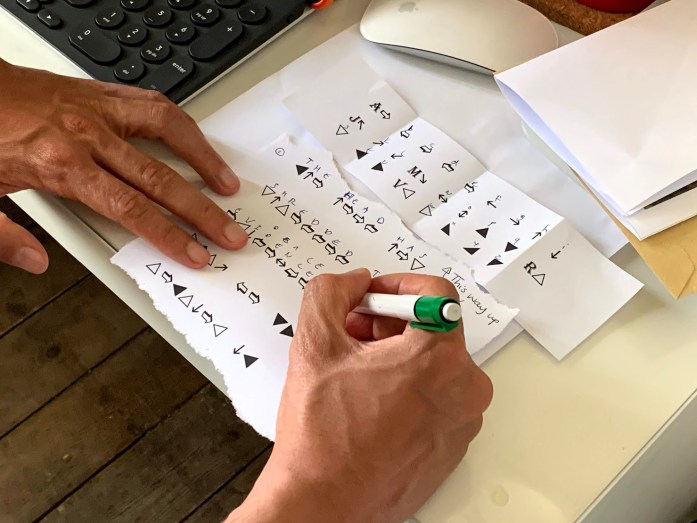
To get going, Jit needed to decode the first coded message with the vague key. This was a Windings message, which I quickly ran up in Word. To make the puzzle a little bit more challenging, I only included some of the letter on the key so he had to work out that it was the alphabet.
Keys and Codes
One of the most fun parts about the escape room I did was unlocking the padlocks. I hid the numbers within the clues and also added false four digit numbers to throw him off the scent. I didn’t have any special boxes, so employed a battery box with some holes to create the lock box. Cheap and cheerful.

I wanted to have a variety of locks, and lucky have a few to hand. I used two number codes, a key lock and the word lock. Having number locks is a great way to do a DIY escape room as you can spread the clues out. If you have some similar keys, which you can use as decoys, then key locks would be great too – play with the kit you have, as it helps keep costs down.
Getting the Anagram
It would have been so easy to have the key from the Case File to open the final box, but I wanted to heighten the anticipation of the final hurdle. I did buy the word lock (about £10 on Amazon) which I am sure I will use again. (maybe for another DIY escape room as I get more proficient in creating them!)
This last part meant that Jit had to gather all the clues together and go through them to find the letters of the anagram. I liked doing this as it meant that he would have to slow down at the most exciting part of the game. I was surprised that he had noticed some of the subtle clues as we went around, which made it easier to gather together.

I hid his main present in the boot of my car, so the final key was my car keys locked in a box with the word lock. Of course, I included a little note in with the keys to finalise the story of the escape room to let him know that it was time to drive to the newsroom to stop press.
DIY Escape Room
Although it was a real challenge for me to create the DIY escape room, it was well worth the effort. Jit had fun and it made a stay at home birthday all the more entertaining. Plus, the winning bit was that Jit found it to be one of the best things from the day (that and his birthday cake!) which certainly made me smile.
If you would like me to come up with a proper How To, printables and kit list, let me know in the comments and I’ll pull something together for you. I’m actually really excited to have another go – my family aren’t going to know what hit them!
